As I’ve mentioned, one of my 30 Before 30 Project goals that I have been super excited about has been #14. Make 5 crafty things I’ve seen on Pinterest. I got some adorable fabric in Portland that I had already DIYed a camera strap cover with, why stop there?? I used this project I saw on Pinterest to guide my project and was off!
The materials couldn’t be simpler. You’ll need:
- A sewing machine
- Tape measure/ruler
- Fabric shears
- Cute fabric
- Neutral fabric
- Pins
- Velcro
- Your lens cap and camera strap, natch
- A pattern (more on that in a sec)
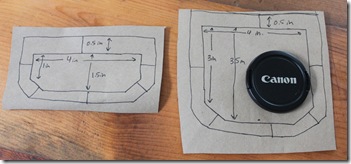
The pattern I drew up was super simple. My lens cap measures 2.75 inches by 2.75 inches so I made a pattern slightly bigger than that to hold it in. My pattern for the pocket measured 5 inches wide by 4.5 inches long, leaving a 1/2 inch hem allowance on each side. My pattern for the flap measured 5 inches wide by 2.5 inches long, leaving a 1/2 inch hem allowance on each side.
Once you have sketched out a pattern, use it to cut out pieces from your fabric. I got this adorable camera/binocular fabric at Cool Cottons in Portland, Oregon. It is by Birch Fabrics and is part of their Monaluna line. Their products are lovely and are 100% organic cotton.
Once all of the pattern pieces have been cut out I highly recommend ironing them. Ironed fabric ensures a tighter seam, avoids wrinkles being sewn into your project, and will guarantee there will be no mis-measurements with your pattern.
Set the pattern pieces aside. Cut another piece of fabric that is 3.5 inches wide by 2 inches long. Sew one seam along the open edge, inside out, then turn it right side out. This will be the piece of fabric that slips your lens cap pocket onto your camera strap cover.
On the outside of one of the pocket pieces, pin this piece on to the middle.
Slide it onto your camera strap to make sure the positioning works. If not, simply adjust it and re-pin.
Sew each edge down. It’s ok to have the thread and seam showing for now, it will all be hidden when the front pocket fabric piece is sewn onto this one. This piece will now be referred to as the pocket back piece.
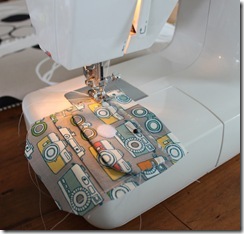
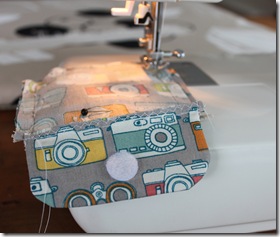
Next, make the flap. Pin the two flap pattern pieces of fabric together, inside out. I like to draw the pattern right onto the fabric lightly in pencil to follow along as I sew. As you can see below, when I got to the corners, I simply lifted up my sewing machine foot and pivoted the material underneath, creating one continuous line. No need to start and stop, or remove your fabric from the machine.
Leave the very top of the flap unsewn (we’ll take care of that later when it gets sewn on to the pocket pieces). Turn the fabric right side out, making sure the corners are defined.
Next, take the remaining pocket pattern piece and lightly drawn the pattern line on it with pencil.
Take a small strip of the neutral fabric (mine was 5 inches long by 1/2 inch wide) and iron a crease on one edge. This piece is just a decorative edge to the pocket, feel free to skip this step if you don’t want to bother with it.
Pin the neutral fabric accent on to the pocket piece, with the ironed edge facing out. Sew straight across the iron crease. This piece will now be referred to as the pocket front piece.
Take the pocket back piece and pin the flap to it. Basically you want the flap sewn on the pocket fabric so that when it is flipped down, it will velcro to the front side of the pocket. I hope this all makes sense, or at least the pictures do. Sew straight across the flap with a zig zag stitch.
Take the pocket front piece and pin it to the pocket back piece, inside out. Trim the fabric around the edges now to make your work easier later.
Sew around the penciled pattern line on the pocket front piece, using the foot lifting and pivoting method I explained before. The pocket will be inside out, all you need to do it turn it right side out!
When you’ve turned the pocket right side out, add two pieces of Velcro to the flap and to the pocket front piece. Hopefully it is easier to see now how the inside out pieces eventually turned right side out, how the strap on the back will attach to your camera strap, and how the accent of neutral fabric looks.
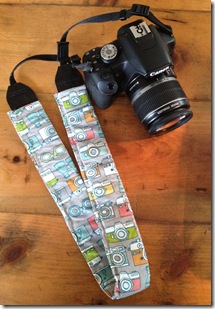
The last step is to adhere the pocket you just made to your camera strap cover! You don’t need a cover to use the lens cap pocket, you can use it with an uncovered camera strap, but I preferred the strap cover because I used Velcro and wouldn’t have done that directly on an uncovered strap.
Place one piece of Velcro just under the front side, on the top portion (the flap). Pleace another piece of Velcro in the middle of the strap on the back. These two pieces of Velcro will hold the lens cap pocket in place, preventing it from sliding up and down the camera strap cover. You don’t have to do this, but the pocket will slide all over the place if you don’t.
Ta-da – you now have a handy pocket to put your lens cap in while you snap away!


If I don’t forget, I may buy some frabric and commission you to make these for my dad for his birthday. (12/2) If you wouldn’t mind doing me the favor of making these again.
Keep me posted. I’d need the dimensions of the strap he has…
Genius!!!!
Aw, thank you!